Change Registered Mobile Number: 5 Easy Steps in Gaming Apps
If you need to change registered mobile number on a gaming app, the route you end up taking depends on one thing only: whether the old SIM still receives messages. That single fact decides whether this takes three minutes or three days. Most of the material floating around online is written for bank accounts and assumes you can walk into a branch, which is no help at all when the number sitting in an app profile is the only key to the account.
This breakdown covers what actually happens inside a gaming app account system, the three flows support teams really use, what they verify and why, and what the change does and does not do to your balance and verification status. No tricks, no shortcuts that do not exist – just the mechanics, in order. 18+ only. Real-money play carries risk and losses are the expected outcome.
The Short Answer
To change registered mobile number on a gaming app where you still have the old SIM: open the profile or account settings section, find the mobile or contact entry, enter the new number, then confirm two one-time codes – one sent to the old number to prove you own the account, and one sent to the new number to prove it is reachable. The change is live the moment the second code is accepted.
If the old SIM no longer works, that two-code handshake breaks and no self-service screen will help you. You move to a manual identity check: a support ticket where you prove you are the account holder using things the number cannot be used to fake – transaction history, the name on your verification documents, the email on file, and the date the account was opened. There is no option that skips this step, and any page or message claiming otherwise is not describing a real app flow.
The reason the process is strict is simple. In a wallet-linked account, the registered number is the recovery channel. Anyone who can swap it can lock the real owner out. Every delay you hit while trying to change it is the same mechanism that stops somebody else changing it on your behalf.
It also helps to know what the change is not. It does not create a new account, it does not reset your sign-in credential, and it does not migrate anything from one profile to another. The account record stays exactly where it is; only the contact field attached to it moves. That distinction matters because a surprising number of people try to solve a number problem by signing up again on the new SIM, which creates a second, empty account and makes the original harder to recover rather than easier.
The one thing to do before you start
If the old SIM is still active but you are about to discard it, do the change first, while both numbers work. A planned swap takes minutes. The same swap attempted a week after the SIM is deactivated becomes a document-backed support case. This is the single most common avoidable mistake in this whole area, and it costs nothing to avoid – keeping a soon-to-be-retired SIM in a spare handset for a fortnight is usually enough.
Three Ways to Change Registered Mobile Number
Gaming apps do not all use the same wording, but behind the labels there are only three mechanisms. Working out which one applies to you before you open a ticket saves a lot of back-and-forth, because each flow asks for completely different things.
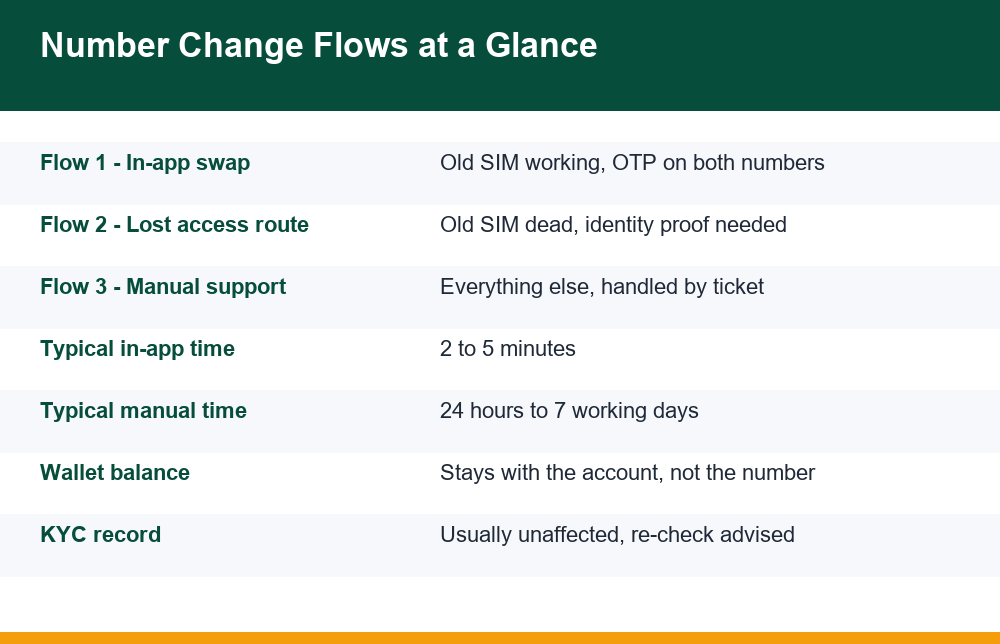
Flow one is the in-app profile change. It is self-service, instant, and available only while the old number still receives messages. Flow two is the lost-access recovery route, sometimes labelled “I no longer have this number” or “unable to receive OTP”. It exists in many apps but is often buried a level or two down. Flow three is a plain support ticket, which is where you land if the app has no dedicated recovery screen, or if flow two rejects your answers.
| Flow | When it applies | What proves identity | Typical wait |
|---|---|---|---|
| In-app profile swap | Old SIM active and reachable | Code on old number plus code on new number | 2 to 5 minutes |
| Lost access recovery | Old SIM dead, lost or ported away | Email on file, account history, documents | 24 to 72 hours |
| Manual support ticket | No recovery screen, or recovery failed | Full document and history review | 3 to 7 working days |
One honest caveat about that wait column: those ranges reflect how these queues generally behave, not a promise. A manual review sits in a human queue, and weekends, festival periods and high-volume days push it out. If a reply has not arrived in the stated window, a single polite follow-up on the same ticket thread is far more effective than opening a second ticket, which usually just resets your place in line.
There is a practical way to work out which flow you are in before you touch the app at all. Send yourself a plain text message to the old number from another handset. If it arrives, you are in flow one and the whole thing is a five-minute job. If it does not arrive and the network reports the number as inactive, you are in flow two or three, and the useful next step is gathering documents rather than hunting for a settings screen that cannot help you. Spending two minutes on that test is the difference between a quick swap and an afternoon of dead ends.
Step by Step: The In-App Profile Swap
This is the flow you want when you change registered mobile number on an account you can still access, and it is worth doing carefully because a half-finished attempt can leave the profile field in a pending state that blocks a retry for several hours.
- Put both SIMs in reach. You will need to read a code from the old number and a code from the new one, usually within a few minutes of each other. If the old SIM is in another handset, have that handset switched on and in signal before you begin.
- Open account settings, not game settings. Look for Profile, My Account, or Personal Details. Sound, graphics and notification settings are a different menu and will not contain the contact fields.
- Select the mobile number entry and choose edit or update. Some apps show the current number partially masked. Confirm the masked digits match the SIM you still hold – if they do not, you are signed into a different account than you think, and you should stop here.
- Verify the old number first. A code goes to the number currently on file. Enter it exactly, without spaces. This step is the app confirming the request came from the account owner.
- Enter the new number and verify it. A second code arrives on the new SIM. Once accepted, the profile updates immediately and you should see the new digits reflected on the account screen.
After the swap, sign out and sign back in once using the new number. This is not a formality – it confirms the login path has actually moved, rather than only the display field. If the login screen still rejects the new number after a full app restart, the change did not complete and should be raised with support rather than retried repeatedly.
Two small details catch people out at step five. The first is that some apps require the new number to be one that has never been used on their system before; if the new SIM was ever registered to an old account of your own, the field may be refused outright, and that is a support matter rather than an input error. The second is the time limit on the codes themselves, which is often shorter than people expect. If the first code has expired by the time you have found the second handset, the app will usually ask you to restart the whole sequence rather than resume it.
If no code arrives at either stage, the problem is almost always delivery rather than the number change itself, and the fixes are the ordinary ones: signal, message storage, DND registration and network-level filtering. Our separate breakdown of what to do when the OTP never arrives on a gaming app walks through those causes in order, and it is worth clearing them before assuming the account is at fault.
When the Old SIM Is Gone
This is the situation that sends people searching in the first place. The number on the account belongs to a SIM that was lost, damaged, deactivated for non-use, surrendered when switching networks, or tied to a work connection you no longer have. The two-code handshake cannot complete, so the app has to establish who you are by other means.
Start by checking whether the app offers a recovery entry point. Look on the login screen, under the code-entry box, for wording like “did not receive the code”, “try another method” or “no longer have access to this number”. If an email address was ever added to the account, this route often works through it: a verification link lands in the inbox, and you can then change registered mobile number from inside the session it opens. This is the fastest non-SIM path that exists, and it is the reason adding a recovery email early is worth the two minutes it takes.
Where no email is on file, the request becomes a document-backed review. Expect to be asked for things only the account holder would know, and expect the review to be unhurried about it. Be patient with the sequencing: give complete answers in the first message rather than drip-feeding details, because each incomplete reply typically adds another full cycle to the queue.
There is one more route worth knowing about, and it is the cleanest of all when it is available. If the SIM was lost rather than given up, many networks will reissue the same number on a replacement SIM to the registered subscriber. If that is possible in your case, doing it first turns a document-backed app review into the ordinary five-minute in-app swap, because the number on the account becomes reachable again. It is worth checking before you commit to a support ticket, since a reissued SIM solves the problem at the source rather than asking an app to work around it.
The ported-number trap
A number that was ported to a different network is a special case worth naming, because people assume it is a dead number when it is not. If the digits are the same and the connection is live on the new network, codes should still arrive and the ordinary in-app swap applies. Port-outs do, however, cause a delivery gap of hours to a couple of days around the switch window. If you are mid-port, the sensible move is to wait until messages are landing reliably again and then do the change normally, rather than opening a lost-access case you do not need.
What Support Asks For: A Checklist
Manual verification is a pattern-matching exercise. Support is comparing what you tell them with what the account record already says. Nothing you supply should ever include a password, a one-time code, or a screen-share of your handset – a genuine support process never needs any of those, and a request for them is the clearest signal you are not talking to real support.
- The old registered number in full, even though it no longer works, so the account can be located.
- The new number you want on the account, written out once, clearly, with the country code.
- The registered name and date of birth exactly as they appear on the account, matching your verification documents rather than a nickname.
- The email address on file, if any was ever added, and confirmation that you still control it.
- Roughly when the account was created – month and year is usually enough, and a surprisingly effective signal.
- Two or three recent transactions with approximate dates and amounts, including deposits or withdrawals, which are very hard for anyone else to guess.
- A clear photo of the identity document already on the account, uploaded only through the app’s own support channel or the official support email address.
Note the shape of that list: it is all history and identity, and none of it is a secret that could be reused against you. That is deliberate. If the information being requested would let the requester take over the account rather than merely recognise you, something is wrong. Credential-harvesting attempts dressed up as account recovery are a recurring fraud pattern, and if you believe you have run into one, the National Cyber Crime Reporting Portal is the official non-commercial place to report it.
How you write the first message matters more than most people expect. A request to change registered mobile number that arrives as one clear paragraph with every item above answered in order tends to be resolved in a single cycle. The same request split across three short messages, each adding one detail, usually goes round the queue three times. Reviewers work from what is in front of them, so completeness reads as credibility.
One more practical point: keep the entire exchange inside a single ticket thread. Verification decisions are made against the thread’s history, and splitting the conversation across email, in-app chat and a second ticket makes the case look less consistent, not more urgent.
Why the OTP Still Goes to the Old Number
This confuses almost everyone who tries to change registered mobile number for the first time, and it is worth understanding rather than working around. When you request the change, the app sends the first code to the existing number because that code is not verifying the new number – it is verifying that the person making the request already controls the account. Sending it to the number being added would prove nothing, since anyone typing in their own number would pass.
So the order is fixed and cannot be reversed from your side: prove the old, then prove the new. Only after the old-number code is accepted does the app send anything to the new SIM. Several apps make this clearer by greying out the new-number field until the first step completes, but plenty do not, which is where the confusion comes from.
It is also why asking support to “send the code to my new number instead” never works, however reasonably it is phrased. That request is indistinguishable from what an account takeover attempt looks like, so the system is built not to honour it. What support can do is run the slower identity review in place of the code – which is the same thing by a different method, and the reason the manual route exists at all.
There is a knock-on effect worth planning for. Because the app will keep addressing the old number until the change completes, any other recovery you attempt in the meantime – including a password reset – will also route there. If you are locked out on more than one front, sort out the sign-in credential and the number in a sensible order; our walkthrough of resetting a forgotten gaming app password covers how those two recovery paths interact and which to tackle first.
What Happens to Wallet Balance and KYC
The short version: your balance belongs to the account, not to the phone number. When you change registered mobile number, funds are not moved, frozen or reset, and the account identifier stays the same throughout. Game history, level progress and any pending transactions are likewise untouched.
Verification records are the part that needs a second look. In most systems the identity documents are attached to the account rather than the number, so a swap leaves verified status intact. There are two situations where that is not quite true. The first is where the number itself was part of what was verified – if the mobile number appears on a document that was submitted, a mismatch can flag the record for re-checking. The second is withdrawals: bank and payment instruments are often verified against the registered contact details, so a payout method that was approved under the old number may need re-confirming before the next withdrawal clears.
The practical approach is to check the verification screen once the number change has gone through, before you try to move any money. If the status reads verified and the payout method still shows as confirmed, nothing further is needed. If either shows pending, treat it as an ordinary re-verification rather than a problem with the number change, and work through it the usual way – the sequence and the common rejection reasons are laid out in our breakdown of how identity verification works inside gaming apps.
Withdrawals during a pending change
While a manual number change is under review, assume withdrawals will be held. This is standard across account systems and not a sign of anything irregular – an account in the middle of a contact-detail change is exactly the state an account takeover produces, so payouts pause until the review resolves. Expecting that hold saves a lot of unnecessary worry, and it is another argument for doing a planned swap while both SIMs still work.
If a deposit or withdrawal is already in flight when the change goes through, let it settle before you judge anything. In-flight transactions reference the account, not the contact field, so they normally complete on their own timetable. The one thing not to do is start a second attempt at the same transaction because the first has not appeared yet; duplicates during a contact change are harder to unpick than a simple delay.
Mistakes to Avoid Before You Start
Most number-change cases that drag on for a week were made harder by something the account holder did in the first hour. These are the ones that come up again and again.
- Discarding the old SIM first. Keep it live until the change is confirmed and you have signed in once with the new number.
- Creating a second account on the new number. This is the most damaging mistake available. Duplicate accounts complicate verification badly, and the balance on the original does not follow you across.
- Requesting codes repeatedly. Rapid retries trigger rate limits and can lock the request for hours. Wait the full interval the app states before trying again.
- Giving a different name than the one on file. Verification is a match, not an interview. A shortened or differently-spelled name reads as a mismatch.
- Replying to someone who contacted you first. Always start the conversation yourself, from the app’s own help section. Unsolicited messages offering to speed up a number change are not support.
- Sending documents through chat apps or to a personal email address. Use only the in-app support channel or the official address listed inside the app.
- Changing the number and the email on the same day. Two contact changes at once looks far more like a takeover than either does alone, and it tends to slow both reviews down. Finish one, confirm it, then start the other.
Finally, record what you did. Note the date you submitted the request, the ticket reference, and the exact old and new numbers you supplied. If the case does need a follow-up, having that detail in one place turns a fresh explanation into a two-line update, and that is usually the difference between a resolved request and a stalled one.
Handled in the right order, the process to change registered mobile number is genuinely routine. Handled after the old SIM has gone silent, it becomes a patient exercise in proving who you are. The whole skill here is noticing which of those two situations you are in before you touch anything – and if the old SIM is still breathing, acting while it is.
Frequently Asked Questions
How do I change my registered mobile number in a gaming app?
Open account or profile settings, select the mobile number field, choose edit, and enter the new number. The app sends one code to the number currently on file to confirm you own the account, then a second code to the new number to confirm it is reachable. Once both are accepted the change is live, usually within two to five minutes. Sign out and back in with the new number to confirm the login path has moved, not just the display field.
Can I update my number if I no longer have the old SIM?
Yes, but not through the self-service screen. Look for a recovery option worded like “no longer have access to this number” or “did not receive the code”. If a recovery email is on the account, that route is fastest. Otherwise the request becomes a manual identity review through support, where you prove ownership with account history and documents instead of a code. Expect 24 hours to about a week depending on the queue. If the SIM was lost, ask your network about reissuing the same number first – that turns the whole thing back into a two-minute in-app swap.
Why does the app send the OTP to my old number when changing it?
Because the first code is not verifying the new number, it is verifying that whoever made the request already controls the account. Sending it to the new number would prove nothing, since anyone could type in their own. The order is fixed: prove the old number, then the new one. Only after the first code is accepted does a code go to the new SIM, which is also why asking support to redirect that first code never works.
What details does support ask for to verify a number change?
The old registered number in full, the new number with country code, the registered name and date of birth as they appear on file, the email address on the account if any, roughly when the account was created, two or three recent transactions with approximate dates and amounts, and a clear photo of the identity document already on the account. Genuine support never asks for your password, a one-time code, or a screen share.
Will changing my mobile number affect my wallet balance or KYC?
The balance stays with the account rather than the number, so funds, game history and progress are untouched. Verification records usually survive the change too, since documents attach to the account. Two exceptions: if the number appeared on a submitted document it may be flagged for re-checking, and payout methods verified under the old contact details may need re-confirming. Expect withdrawals to be held while a manual change is under review.
